Dikuasakan oleh Blogger.
  • Home
  • Author
  • Tutorial
    • Blog Tutorial
    • Blogskin Tutorial
    • Photoshop Tutorial
  • Freebies
  • Blogskin
ig shop fanpage instagram

I N F I N I T E


:3
Assalamualaikum :)
Sorry kepada yang mengrequest coz arrien lambat buat tuto nie, hari tu buzy dengan GA :D btw here arrien share code untuk Slideshow GA yg arrien punya tu. But jangan re-post or re-tuto tutorial ini, code ini arrien punya. So tolong hormat yea :)
| PREVIEW |
No Re-Post & Re-tuto
Template Designer.
1. Dashboard > Layout > Add a Gadget > HTML/JavaScript.
2. Copy code ini :
<br /><center><div style="background: #fff; border: 2px solid #444444;border-radius:5px; padding: 0px; width: 600px;"><div style="text-align: center;"><marquee behavior="alternate" direction="down" onmouseout="this.start()" onmouseover="this.stop()" scrollamount="3"><br />
<a href="Url entry GA"><img src="Url banner GA" style="border: 1px solid #D4D3D3; height: 100px; padding: 4px; padding: 5px;width=" 160" /></a> <a href="Url entry GA"><img src="Url banner GA" style="border: 1px solid #D4D3D3; height: 100px; padding: 4px; padding: 5px;width=" 160" /></a> <a href="Url entry GA"><img src="Url banner GA" style="border: 1px solid #D4D3D3; height: 100px; padding: 4px; padding: 5px;width=" 160" /></a>
</marquee></div></div></center>
3. Paste kan dalam kotak HTML/JavaScript tadi.
4. Save.

Classic Template / Blogskin.
1. Dashboard > Template > Edit HTML.
2. Use Ctrl+F dan cari code <blogger>
3. Copy code ini :
<br /><center><div style="background: #fff; border: 2px solid #444444;border-radius:5px; padding: 0px; width: 600px;"><div style="text-align: center;"><marquee behavior="alternate" direction="down" onmouseout="this.start()" onmouseover="this.stop()" scrollamount="3"><br />
<a href="Url entry GA"><img src="Url banner GA" style="border: 1px solid #D4D3D3; height: 100px; padding: 4px; padding: 5px;width=" 160" /></a> <a href="Url entry GA"><img src="Url banner GA" style="border: 1px solid #D4D3D3; height: 100px; padding: 4px; padding: 5px;width=" 160" /></a> <a href="Url entry GA"><img src="Url banner GA" style="border: 1px solid #D4D3D3; height: 100px; padding: 4px; padding: 5px;width=" 160" /></a>
</marquee></div></div></center>
4. Paste BAWAH code yang korang cari tadi. If code yang korang cari tadi ada dua,maka pastekan dibawah kedua-dua code <blogger> tu.
5. Preview & Save.

Oke done,korang boleh la ubahkan dia punya color border or size dan yg sepatutnya :)

Share
Tweet
Pin
Share
2 Comments

kawaii
Assalamualaikum :)

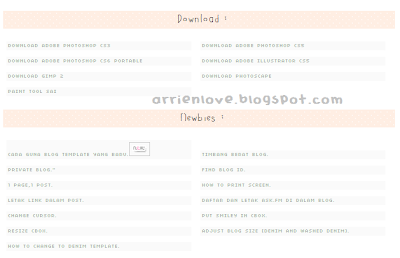
Tuto nie direquest oleh adik Anis, dia tanya macam mana nak buat list tutorial macam arrien punya. So here i made the tuto. Sorry kalau tajuk korang tak faham coz arrien tak tahu nak bagi tajuk apa untuk tuto nie XD and coz lambat buatkan tuto nie. Buzy oke :D


Template Disegner.
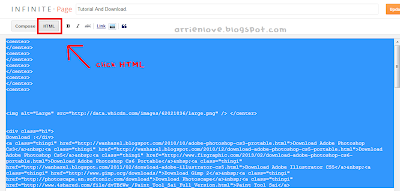
1. Your Page > HTML.


2. Copy code dibawah nie.
<style>
.h1 {
padding-left:10px; color: #000; font:20px cd; line-height: 2px; background:url(URL BACKGROUND); text-align: center; letter-spacing:1px;
}
@font-face{font-family:cd;src:url('http://static.tumblr.com/tedujjb/C78mkkmk4/charleedoodles.ttf')}
a.kiml{
display:inline-block;
width: 285px;
padding:3px;
margin:5px;
background:#fafafa;
font:8.3px tt;
text-align:left;
Text-decoration:none;
color:#b0b0b0;
text-transform:uppercase;
border:0px solid #b1b1b1;
}
a.kiml:hover{
-webkit-transition-duration: 0.5s; color: #000;}
@font-face {
font-family:tt !important;
src: url('http://static.tumblr.com/rmj06l2/Usellxb4i/tinytots.ttf') !important;
}
</style>
<div class="h1">TITLE :</div>
<a class="kiml" href="LINK" >AYAT</a><a class="kiml" href="LINK" >AYAT</a><br><a class="kiml" href="LINK" >AYAT</a><a class="kiml" href="LINK" >AYAT</a><br>
3. Paste kan dalam kotak HTML tadi.
4. Update.

Template Classic / Blogskin
1. Dashboard > Template.
2. Ctrl+F dan cari code </style>
3. Copy code bawah nie.

.h1 {
padding-left:10px; color: #000; font:20px cd; line-height: 2px; background:url(URL BACKGROUND); text-align: center; letter-spacing:1px;
}
@font-face{font-family:cd;src:url('http://static.tumblr.com/tedujjb/C78mkkmk4/charleedoodles.ttf')}
a.kiml{
display:inline-block;
width: 285px;
padding:3px;
margin:5px;
background:#fafafa;
font:8.3px tt;
text-align:left;
Text-decoration:none;
color:#b0b0b0;
text-transform:uppercase;
border:0px solid #b1b1b1;
}
a.kiml:hover{
-webkit-transition-duration: 0.5s; color: #000;}
@font-face {
font-family:tt !important;
src: url('http://static.tumblr.com/rmj06l2/Usellxb4i/tinytots.ttf') !important;
}

4. Pastekan di atas code yang korang cari tadi.
5. Kemudian copy code nie pulak.
<div class="h1">TITLE :</div>
<a class="kiml" href="LINK" >AYAT</a>
<a class="kiml" href="LINK" >AYAT</a><br>
6. Paste kan dibahagian tutobies korang.
7. Preview & Save.

Note :
Red : Url Background.
Blue : Color Code.
Orange : Title.
Purple : Link Tutorial.
Pink : Name of the tutorial.

Credit : The Tutubies

Share
Tweet
Pin
Share
8 Comments
Older Posts

About me

DmPRDCbQC2A/WJoToqY-gPI/AAAAAAAAAL8/CMgWRh6OFVoy7elrJJWlL1dnOuMsrmrrQCLcB/s1600/about.jpg"
/ />

Aenean sollicitudin, lorem quis bibendum auctor, nisi elit conseat ipsum, nec

sagittis sem nibh id elit. Duis sed odio sit amei.

FOLLOWER

Follow Me

  • IG shop
  • facebook
  • instagram

recent posts

Blog Archive

  • ▼  2019 (3)
    • ▼  Mei (1)
      • Salam Ramadhan 2019!
    • ►  April (1)
    • ►  Januari (1)
  • ►  2018 (11)
    • ►  Oktober (1)
    • ►  Mei (3)
    • ►  April (4)
    • ►  Januari (3)
  • ►  2017 (9)
    • ►  Mei (1)
    • ►  April (6)
    • ►  Februari (1)
    • ►  Januari (1)
  • ►  2016 (20)
    • ►  November (10)
    • ►  Oktober (6)
    • ►  September (1)
    • ►  Ogos (1)
    • ►  Julai (1)
    • ►  Februari (1)
  • ►  2015 (40)
    • ►  Oktober (1)
    • ►  September (2)
    • ►  Julai (1)
    • ►  Jun (6)
    • ►  Mei (4)
    • ►  April (7)
    • ►  Mac (10)
    • ►  Februari (6)
    • ►  Januari (3)
  • ►  2014 (38)
    • ►  Disember (5)
    • ►  November (2)
    • ►  Oktober (1)
    • ►  Jun (5)
    • ►  Mac (3)
    • ►  Februari (6)
    • ►  Januari (16)
  • ►  2013 (358)
    • ►  Disember (49)
    • ►  November (45)
    • ►  Oktober (25)
    • ►  September (13)
    • ►  Ogos (38)
    • ►  Julai (24)
    • ►  Jun (34)
    • ►  Mei (32)
    • ►  April (21)
    • ►  Mac (27)
    • ►  Februari (24)
    • ►  Januari (26)
  • ►  2012 (135)
    • ►  Disember (37)
    • ►  November (37)
    • ►  Oktober (21)
    • ►  September (8)
    • ►  Ogos (12)
    • ►  Julai (4)
    • ►  Jun (2)
    • ►  Mei (6)
    • ►  April (2)
    • ►  Mac (2)
    • ►  Januari (4)
  • ►  2011 (3)
    • ►  Disember (3)
Facebook Twitter Instagram Pinterest Bloglovin
FOLLOW ME @iena_inspirit97

Created with by ThemeXpose | Distributed By Gooyaabi Templates